About Me.
I’ve been a Photographer for nearly 10 years and done a degree in professional photography. Like any hobby or business, it takes years to build up your equipment and can cost thousands of pounds. I started off with the basics, and as I my interest increase so does the spec of you equipment. As I’m wheelchair bound, landscape photography at times can be challenging, and I bought the DJI Mavic Air, the DJI Mavic Pro 2 came out. I understand having a better sensor and larger image size, gives me better quality in the images I can take and then edit, and is the reason I got the MP2.
Landscape photography, for me, is about passion, the excitement of the unknown. The UK has some beautiful landscapes and coastal regions, and if you look around you might find it on your own doorstep.
As a photographer, the main things one I would carry with me is a camera, tripod, and remote control, light meter, phone app.
I work in manual mode and have the lens focus in manual mode; this gives me the ability to work within the conditions that I want to control. A camera like my Sony A99II has some great built in feature, like being able to increase magnification so in can focus manually on the a horizon so everything is in focus and sharp. Using a tripod and remote, means I can reduce the risk of any vibration.
Using a light meter allows me to set the iso and f-stop to give the right shutter speed, this can be reverse and set the iso and shutter speed to give the right f-stop. I use the Sekonic NP Finder 5 Degree on L-478DR, which allows me to focus on the brightest spot in the composition so I can get the right information. I can also set the shutter to bulb mode, this means I can control how long the shutter is left open to let the as much light in as possible to make the image stand out and give that creamy look to water and sky.
Having this much flexibility to photograph a sunset is great, but with a drone, you do at present have limitations, but there are ways round it to get the best out of the drone.
Using the DJI Mavic Pro 2
Drone photography and filming.
You can’t get away from the fact that using a drone comes with a lot of responsibility and regulations that you have to adhere to. So some of what you're about to read might seem like overkill but sadly we have to justify using a drone in places that might be deemed as a place of caution, which just about covers everywhere.
Sunrise - Golden Hour.
It doesn't matter if you photographing or filming sunsets or sunrises, there is a thing called the golden hour where the light produces some amazing colors, which can produce great images. This changes at different points during the year as to what kind of effect you will get within the color range.
Research Proof
It’s worth mentioning at this point, having screenshots, Nat’s flight plan log and copy of your public liability insurance for your planned shoot with you is a good idea, so if someone questions you, then you have the all the relevant info to put their mind at rest.
This might seem like over kill, but is it? Many who have a PCFO at times have to produce a flight plan that will look at flight risk, etc. Sadly it might become a requirement in time for hobby pilots, so getting use to building your flight plan to photograph something like Glastonbury Tor or some other place of interest, is worth getting use to.
Your Location.
Finding places of interest is so much easier in today’s world of technology. If I've come across an image, I Google to see where it was taken and then use Google Earth to see how I might make an image differently to what I've seen.
Sample Shoot
So I’ve looked at Glastonbury Tor to photograph at sunrise.
I’ve used the NAT’s app to check if I can fly in this area. So looking at the image, I can see there is caution of people may congregate, but as this will be at sunrise, there shouldn’t be very many people around, but I still need to cautious.

NAT’s app location takeoff point.

Hazard and Caution information.
Using Google maps, I’ve found a place where I can park my car (I have a disabled badge) and access the field to take off from. Looking at the two images I can see a good place to access a field with a path that leads up to the Tor.

Google Maps Search for access to Glastonbury Tor.

Google Maps View of road to park.
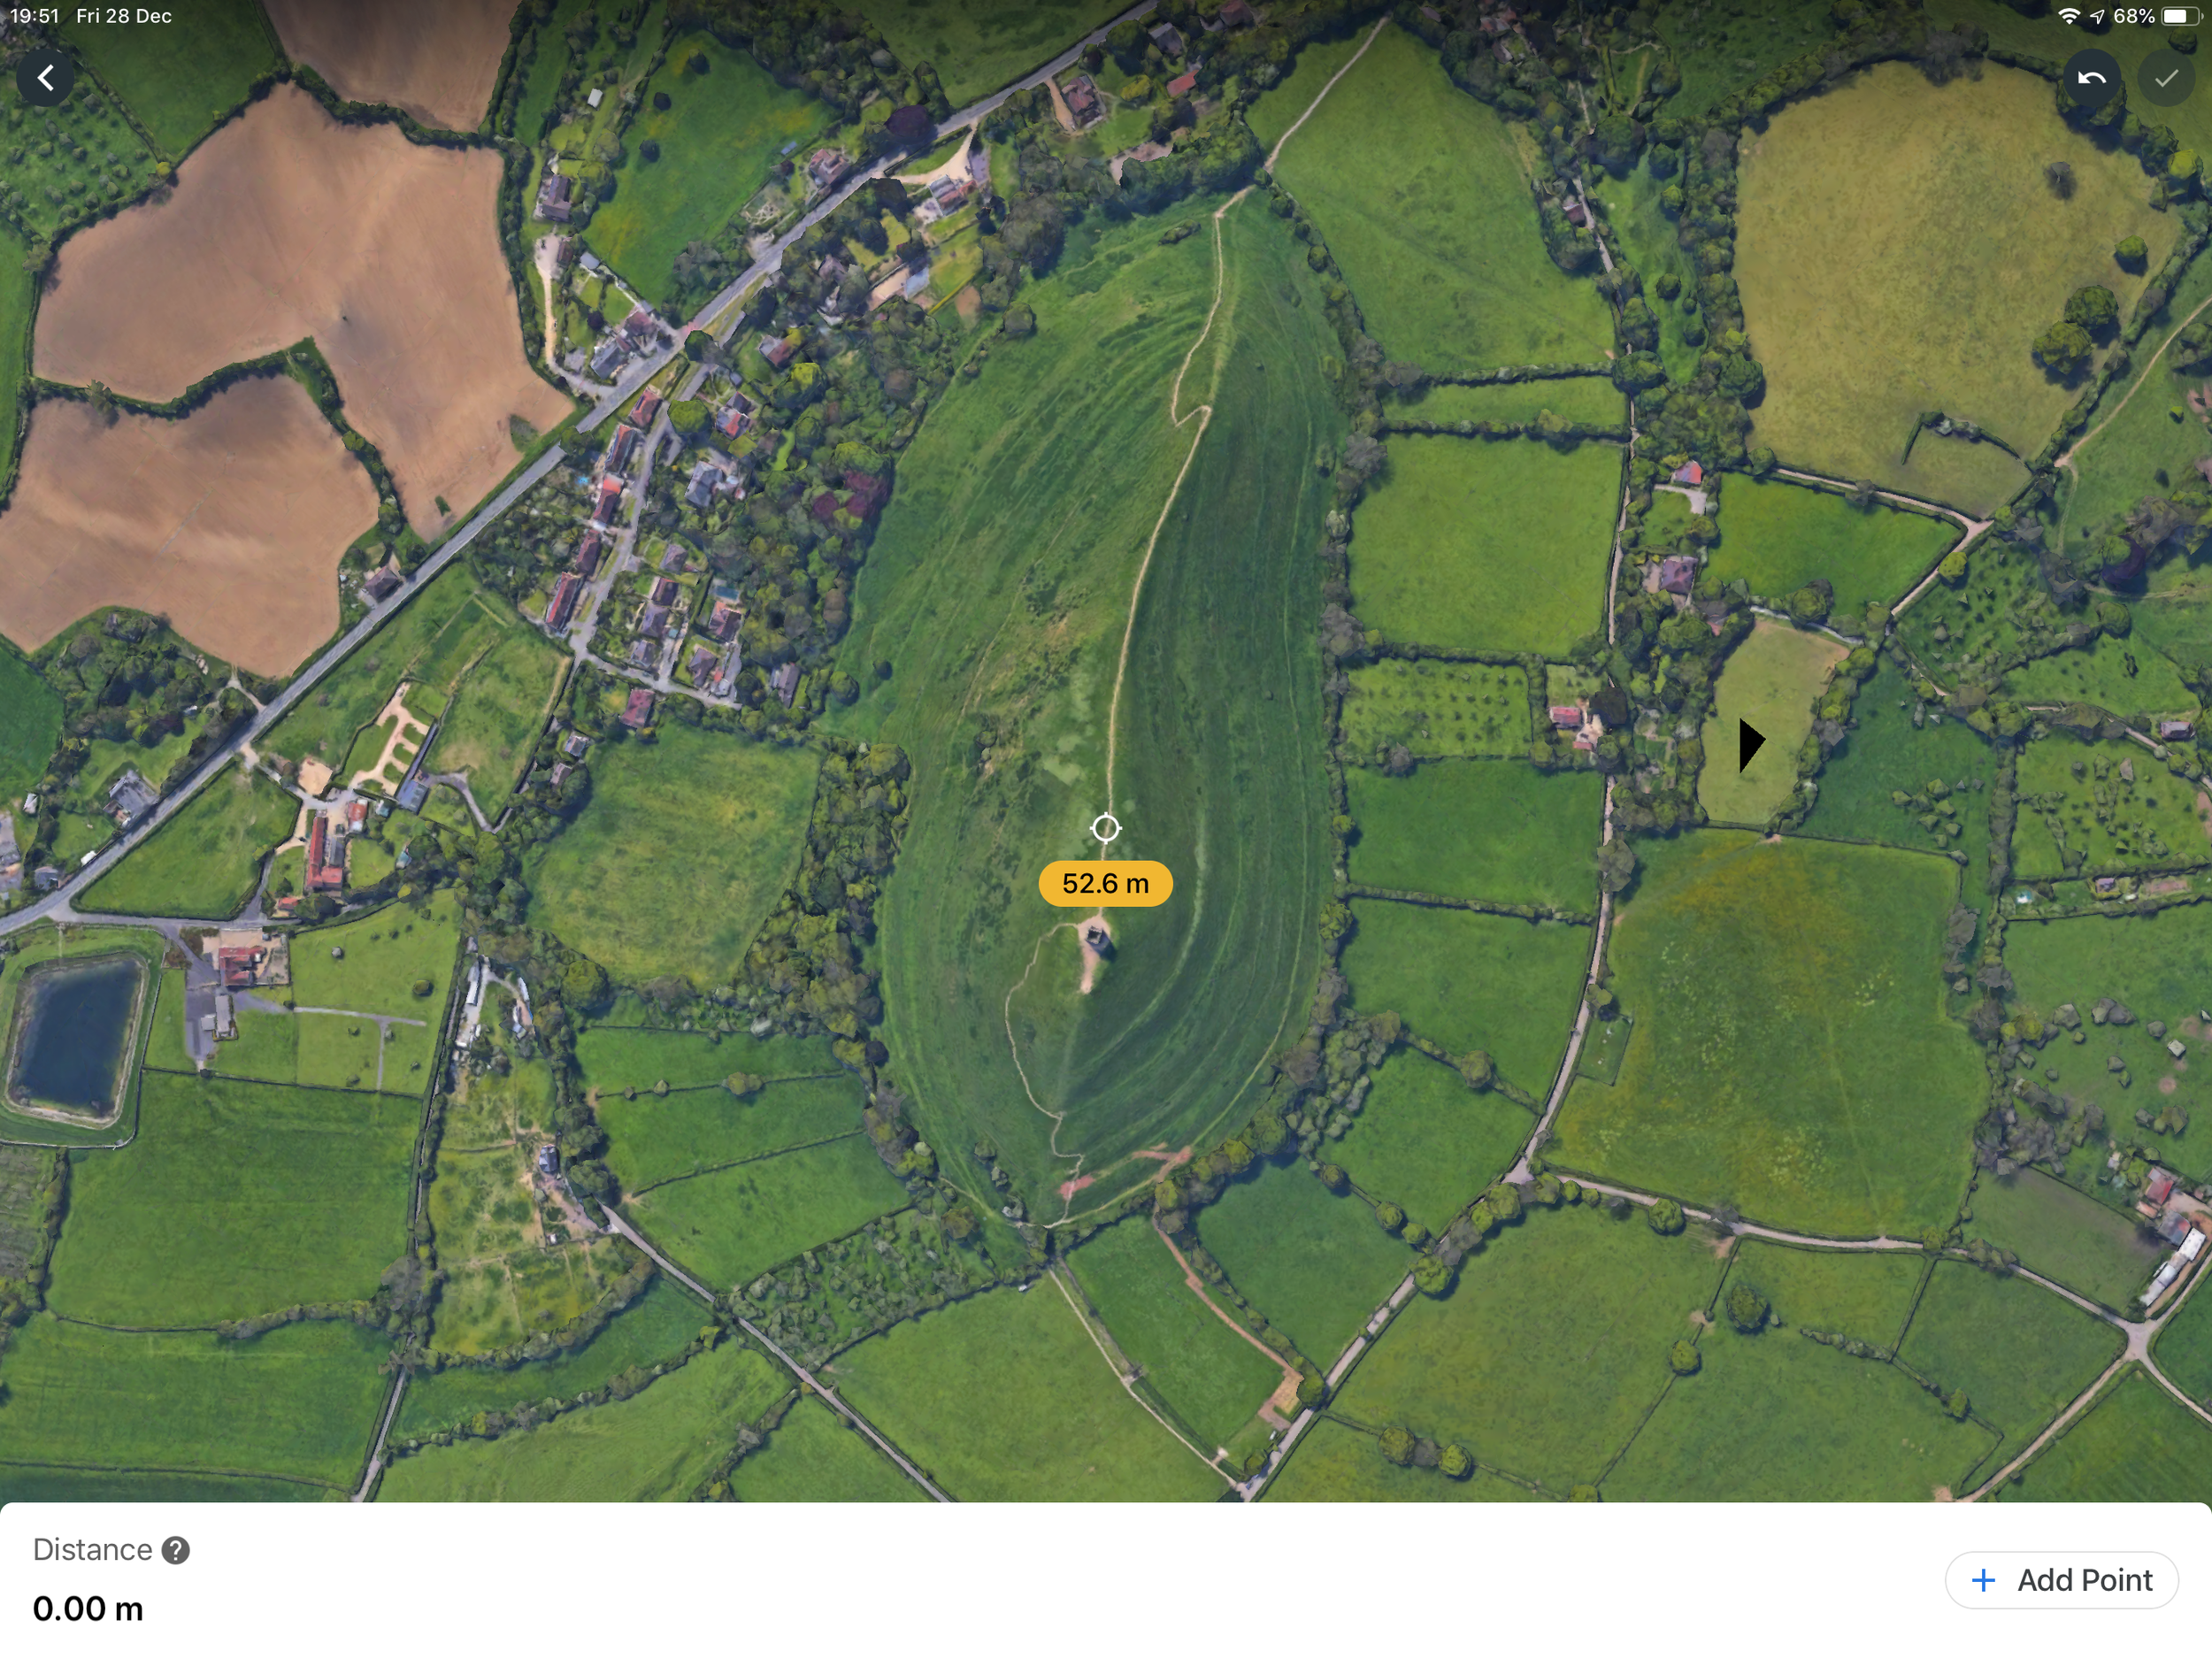
Using Google Earth, I can measure from my takeoff point to the point of top of the Tor, which are 226m. But I also need to know the positions, which at least 50m from the Tor from North, East, South and West, so I can use the measure tool to see where I need to be on the land as a sort of marker. I’ve also Goggled to see what the height of the Tor is which is 521m high.

Using Google Earth to measure from takeoff point to Tor

Measuring distance from Tor.

Measurement from behind the Tor.
Measurement from in front of the Tor.
The regulations are that you have to be a maximum of 120m high, but as this is a Tor is 521m, I need to add the 120m to the 521m, which is a total of 641m. This is because the regulation does take into account how the land can rise which is in article 94A - 400ft height limitation interpretation. So in my App settings I need to adjust my maximum height, which is currently set at 120m to 640m to be safe.

CAA description on how the land can undulate and can be taken into account.
With all this information, I can also use a 3D image of the Tor to be able to see where I can be and take all this in and have to hand, when I actually go and do the flight.

3D image taken from Google Earth as a reference.
PhotoPills App
By entering your location for your shoot, it will show you when and where the sun will rise, as well as time of the golden our. But it does a lot more, if you want to be creative with your shots, you can see where the sun will just sit just on top of a ridge or at some other point of interest, it opens up your creativity as the drone allows you to move 360 degree around a scene.
Since the Tor is on a hill, I can angle the drone to have the tor in the image with the sun behind it. If the conditions are good, it might give other images to create from this point.
Here's a link to their website where you can download the Android or iso version.
Link to PhotoPills

PhotoPills tell’s me the sun rises at 05:47, so I can work out my journey time to arrive in plenty of time to setup.

PhotoPills can also show me how long the golden hour will last for and direction the sun will travel from my point of interest.
The DJI Mavic Pro 2 has some amazing features like f-stop from 2.8/11 and a shutter speed of 1-8th/ 8000sec as well as manual mode of the lens, and tripod mode. It would be great if DJI could build into the software bulb mode, as this could really make the drone a real camera experience. The software does have bracketing mode of 3/5 shots, allowing you to take different exposures that then can me blended together in editing. This will give you a normal exposure, over exposure and under exposure. It allows you to pick up elements you bring together to make a powerful image and give it the pop effect. You can create HDR images, which is known as baking, but can look over saturate and you can see lines on top of edges that can make for a bad image, but third-party software’s has got better and makes the images look more natural, but editing is another story.
ND Filters.
The use of ND filters is great, but they will darken the whole image, which at times you need. But using ND/PL (polarizing) can really useful, as the glass is a gradient from dark to clear. So you can darken the lighter area that would normally be over expose like the sunlight and clouds and keep the ground looking as normal exposure.
PolarPro ND filters, have designed an app, for video and photography. It’ very simple to use with setting your frames per second, then putting in the current shutter speed which will then tell you the best ND/PL to use for those settings.
The app is available in Android and IOS
Camera ISO
One thing that you need to keep as low as possible or maintained always is the iso at 100 if you can. You may have wondered what does iso actually stand for; well it's the International Organization of Standardization, which is the main governing body that standardizes sensitivity ratings for camera sensors. But the higher the iso the grainier the image will become. Some professional cameras are good at handling higher iso; my Sony A99II is good up to 1600 before the graining becomes more apparent. But in post editing this can be correct to a degree.
Ever Changing Light
The thing with sunrises or sunsets, the light changes and it’s been mindful of this and you will have to adjust your camera settings every 10/15 minutes.
As the golden time is 60 minutes, you can bring your drone back, change the ND/PL from 4ND/PL to 8ND/PL or 16ND/PL and launch the drone again and again.
Final words.
This is just one way of researching and working to do a sunrise image, and may seem a lot of planning, but photographers work in a very similar way, but are not governed by regulations like drone pilots. It’s all a preparation and planning that can save you time and effort. Check all your gear is prepped like batteries and controller is charged, latest firmware update, all the leads you might need, phone tablet updated and charged and then double check and the last thing you want is to drive for hours and then find you’ve left the most simple of things like your SD card!